How to use Timer Events correctly in BPMN?
21-01-2026
9 min
Timer Events are among the most powerful mechanisms in BPMN for automating delays, schedules, reminders, and timeout handling. However, many people use them to show duration of Tasks, “waiting up to X days”, or general business delays that simply don’t work the way BPMN defines Timers.
This article explains how BPMN Timer Events really work, using clear examples and pointing out common modeling mistakes. If you want to improve the quality of your BPMN diagrams and avoid typical errors, this guide will help you.
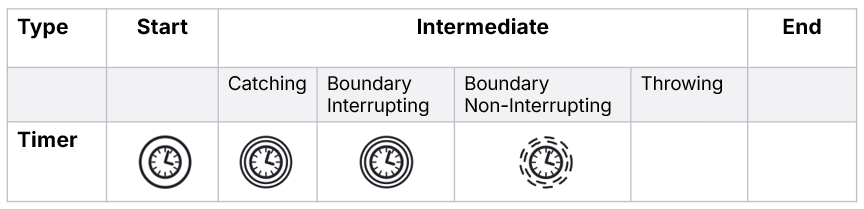
Timer Event Types in BPMN (Specification Overview)
Before diving into each Event type, here is a summary of the Timer definitions available in BPMN.
What a Timer expression really is
A BPMN Timer expression is basically a simple numeric expression that describes when something should occur:
- A specific time (e.g., June 1, 2025)
- A specific time of day (e.g., 8:00 daily)
- A duration (e.g., 24 hours after something happens)
- A repeating cycle (e.g., first day of every month)
A Timer never describes how long an Activity lasts. It tells us when the Process starts or when the next step may continue.
Timer Start Events - scheduling a new Process instance
A Timer Start Event automatically starts a new Process at a specific time or on a repeating schedule. No human interaction required.
There are two common types:
Case 1: A Process that happens only once
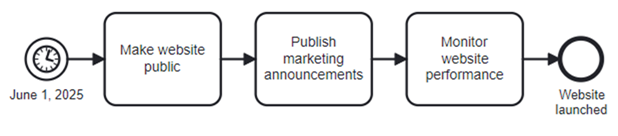
In the first example, the Process begins on a single scheduled date: June 1, 2025, when the company launches a new website.
- Timer Start Event triggers once.
- The process runs through the sequence of tasks.
- It will never trigger again.
This is a perfect use case for a date-based Timer Start Event - a one-time scheduled business event.
Case 2: A Process that starts cyclically

The second example shows a daily reporting Process starting automatically at 8:00 every day:
- At 8:00, a Process engine creates a new Process instance.
- It collects data, generates a report, and sends it to a manager.
- Tomorrow at 8:00, another instance starts.
This is the correct usage of a repeating cyclic Timer Start Event.
Timer Intermediate Events - adding a delay in the Process
Timer Intermediate Events appear in the middle of a Process, not at the start. They force the Process to wait before moving on.
There are two main patterns:
Case 1: Wait a duration (e.g., 24 Hours)

After replying to a customer, the Process must wait exactly 24 hours before sending a follow-up email.
This is correct because:
- The timer expresses a duration (24 hours).
- The delay happens after the previous Activity finishes.
This is a classic duration-based Intermediate Timer Event.
Case 2: Wait until a specific date (e.g., 1st day of next month)

A report is reviewed, but approval should only happen on the first day of the next month.
- The Timer waits until that specific calendar date.
- When the date arrives, the next Activity begins.
This is a correct use of a date-based Intermediate Timer Event.
Common mistakes with BPMN Timers (and how to avoid them)
Many BPMN models misuse Timers to show how long a Task takes or to indicate “up to” waiting periods. Let’s look at the examples and why they are wrong.
Mistake 1: Using a Timer to show Task duration
 Example: Showing that “Prepare workstation” takes 2 days by placing a Timer Event afterward.
Why it’s incorrect:
- A Timer always adds a delay, it does not represent Task duration.
- The model becomes misleading: it now means “wait 2 days after preparing a workstation”, not “the Task takes 2 days”.
Correct approach: If an Activity usually takes two days, this should be noted in the documentation.
Mistake 2: Using a Timer to show “Wait up to 5 days”
 Example: Putting a Timer after “Send proposal” with “up to 5 days”.
Why this is wrong:
- A Timer with “5 days” means the Process will always wait exactly 5 days.
- It does not mean “wait up to 5 days, but react sooner if customer responds”.
Why this is dangerous: You risk ignoring early messages from the customer.
Correct approach: Use an Event-Based Gateway if you need to react sooner (explained later).
Advanced Uses: Timer Boundary Events & Event-Based Gateways
Now let’s look at correct modeling techniques for two very important scenarios.
Scenario 1. Setting Maximum Execution Time - Timer Boundary Events
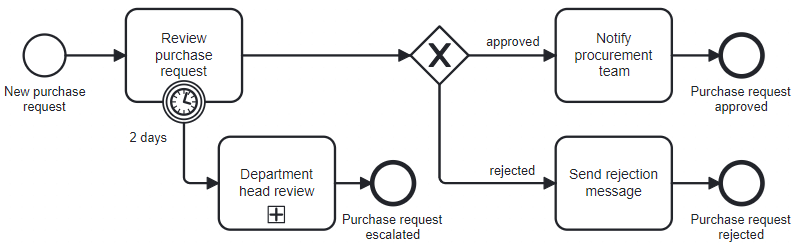 Example: Approving a purchase request
A new purchase request is sent for review. If the review is completed within two days, the process ends by either notifying the procurement team (approved) or sending a rejection message (rejected).
If the review is not completed within two days, a Timer triggers an escalation that interrupts the original review and forwards the request to the department head. The department head’s review activities are encapsulated within a Sub-Process. After the escalated review is completed, the final decision again results in either notifying procurement or informing the requester of the rejection.
A Timer Boundary Event is attached to an Activity. Its purpose: interrupt the Task if it takes too long.
Non-Interrupting Timer Boundary Event Example
Not every timeout should stop the Task. Sometimes the work must continue, but the business still wants visibility when something takes too long. This is where a Non-Interrupting Timer Boundary Event is used.
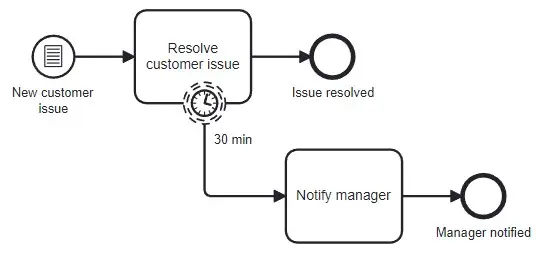 Example: Resolving a customer issue.
Imagine a Process for handling new customer issues. When an issue arrives, a support agent begins working on it right away in the Task “Resolve customer issue”. Normally, issues should be handled quickly. The company has a rule:
If resolving the issue takes more than 30 minutes, notify the manager - but do NOT interrupt the work.
To model this correctly:
- The Task “Resolve customer issue” has a Non-Interrupting Timer Boundary Event attached.
- The timer is set to 30 minutes.
- If the agent is still working after 30 minutes, the Timer fires and creates a parallel notification Task, such as “Notify manager”.
- The agent continues resolving the issue without being interrupted.
- If the issue is resolved sooner (in less then 30 minutes), the Timer simply never fires.
This pattern allows the process to track deadlines and alert supervisors without stopping the ongoing work. It is ideal for reminders, SLA monitoring, and escalating visibility while allowing the original Task to proceed normally.
Scenario 2. “Wait up to…” or “Wait until scheduled time” - Event-Based Gateway + Timer
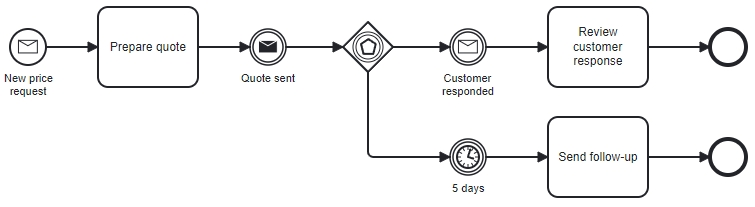 Example: Sending a quote to a customer
When the Process should stop and listen for multiple possible Events, one of which is time-based, you must use an Event-Based Gateway, not a Timer alone.
Correct patterns:
- If customer responds in less than 5 days → follow response path.
- If no response for 5 days → Timer triggers → follow “no response” path.
Why this requires an Event-Based Gateway?
A simple Timer Event alone would force the Process to always wait 5 days, even when the customer responds earlier.
The Event-Based Gateway solves this by listening for multiple possible events:
- Customer message
- Timer expiration
Whichever happens first triggers the next step.
Summary
BPMN Timer Events define when something should happen - specific dates, times, durations, or cycles - not how long tasks last.
Timer Start Events automatically begin a process on a schedule. Intermediate Timer Events add delays within a Process.
Avoid using Timers to show Task duration or “wait up to” periods since Timers always wait the full time.
Use Timer Boundary Events to set deadlines (interrupting or non-interrupting), and use an Event-Based Gateway with a Timer when the Process must react to whichever Event happens first.
Timers handle timing and deadlines - not Task length - and must be combined with the right elements to reflect real business behavior.